


Injection Molding Mold Parts: Core, Cavity, Ejection, and Guide Parts
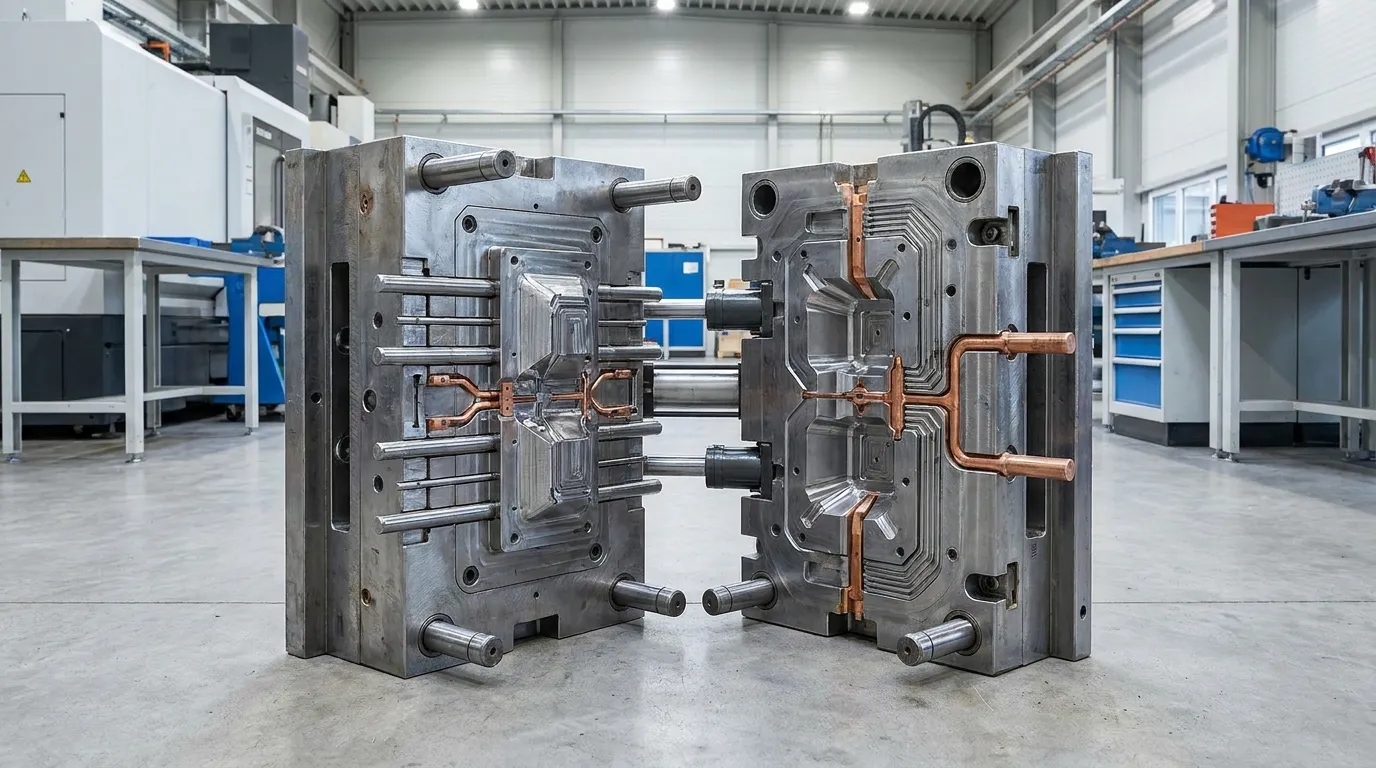
Injection molding mold parts include the core, cavity, ejector system, guide components, runners, gates, cooling channels, and venting features. These systems work together to shape plastic parts, maintain alignment, control resin flow, and release finished products safely. High-quality mold components improve dimensional accuracy, reduce wear, prevent defects like flashing or sticking, and help manufacturers maintain stable production across long production runs.
Injection molds work as complete systems, but every system depends on the quality of its individual parts. A worn guide bushing, poorly positioned ejector pin, or inefficient cooling channel can create defects even when the rest of the mold looks fine. Understanding how these components work together helps engineers, buyers, and production teams make better tooling decisions and avoid expensive downtime later.
What are the main parts of an injection molding mold?
Injection molding mold parts are usually grouped into forming, alignment, ejection, cooling, and flow-control systems. Each group affects part quality, mold life, and production consistency in different ways.
Most injection molds contain the same core component groups, even when part designs vary. The core and cavity create the molded shape, alignment parts keep mold halves positioned correctly, and ejection systems remove cooled parts after molding. Cooling channels, runners, and gates manage heat and resin flow throughout the cycle.
If you need a broader breakdown of complete mold architecture, this mold component overview explains how these systems connect inside a full tooling setup.
According to the Wikipedia injection molding overview, standard molds also include venting features, mold plates, and clamping systems that support pressure and alignment during production.
Injection Mold Component Function Table
| Component Group | Main Function | Common Failure Risk | Production Impact |
|---|---|---|---|
| Core and cavity | Form part geometry | Wear and mismatch | Flashing, dimensional errors |
| Guide system | Maintain alignment | Bushing wear | Parting line defects |
| Ejection system | Remove molded parts | Pin damage | Scratches, sticking |
| Runner and gate system | Direct resin flow | Gate wear | Short shots, imbalance |
| Cooling system | Control mold temperature | Poor cooling flow | Warping, long cycle times |
| Venting system | Release trapped air | Blocked vents | Burn marks, incomplete filling |
What is the difference between the core and cavity?
The cavity forms the external shape of the plastic part, while the core creates internal features and hollow sections. Both must stay precisely aligned to avoid flash, warping, or dimensional defects.
The cavity side usually creates the visible outside surface of the molded part. The core side forms internal details such as holes, ribs, or mounting structures. During injection, molten resin fills the space between these two surfaces to create the finished component.
A detailed injection mold basics guide can help if you want to understand how the full molding cycle supports these forming surfaces.
| Feature | Core | Cavity |
|---|---|---|
| Main role | Creates internal geometry | Creates outer shape |
| Exposure | High pressure and friction | High surface finish demands |
| Common wear issue | Abrasion and sticking | Surface scratches |
| Quality impact | Internal dimensions | Cosmetic appearance |
The core often experiences higher mechanical stress because parts shrink around it during cooling. This is why ejector placement matters so much. If the core surface grips the plastic too tightly, the ejection system can damage the finished part during release.
For example, medical device housings often require highly polished cavity surfaces to maintain cosmetic quality. At the same time, the core may need hardened steel inserts to resist wear from repeated production cycles.
Which mold parts control alignment and precision?
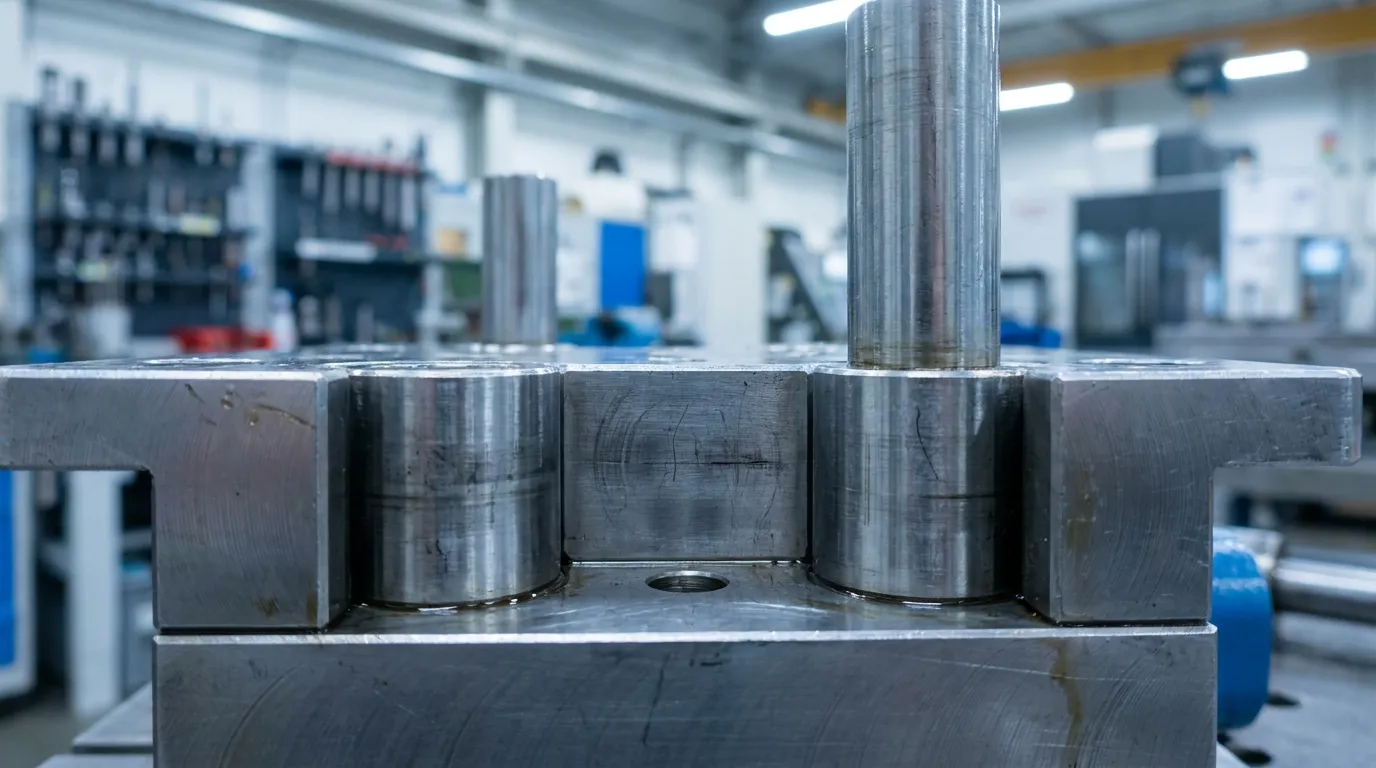
Guide posts and bushings keep mold halves aligned during every cycle. Poor alignment increases wear, flashing, part mismatch, and long-term tooling instability.
Alignment systems control how accurately the mold closes during production. Even slight misalignment can create flashing at the parting line or uneven pressure across the cavity surface. Over time, this accelerates mold wear and reduces dimensional consistency.
The guide components section explains how precision alignment parts support repeatable molding performance.
According to the Agilian mold components guide, guide pins and bushings are among the most important wear surfaces inside production tooling.
Alignment Failure If-Then Table
| If This Happens | Likely Cause | Production Result |
|---|---|---|
| Flashing at parting line | Worn guide bushings | Excess resin leakage |
| Uneven cavity pressure | Misaligned mold halves | Part distortion |
| Rapid wear on cavity edges | Poor alignment repeatability | Reduced mold life |
| Surface mismatch | Damaged guide posts | Visible part defects |
Lower-cost guide systems are not always the best long-term option. They may work for short production runs, but high-cycle molds usually need hardened alignment components to maintain precision over time.
An automotive interior trim mold is a good example. After extended production cycles, worn guide bushings often create flashing along visible edges. Replacing only the cavity inserts rarely fixes the issue if alignment wear caused the original problem.
How does the ejection system remove molded parts?
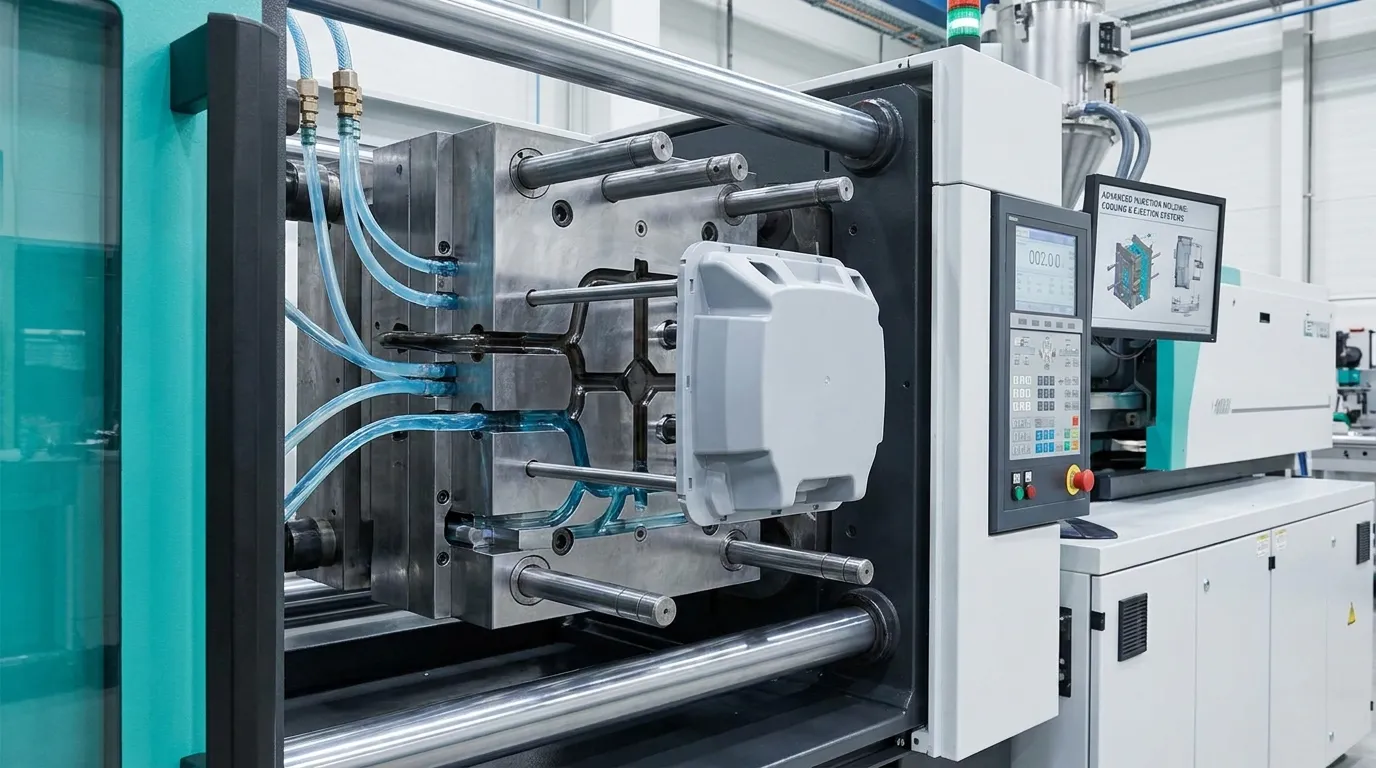
Ejection systems push cooled plastic parts out of the mold after solidification. Incorrect ejector placement can leave marks, crack parts, or create deformation during release.
After cooling, the mold opens and the ejection system pushes the finished part away from the core. Most molds use ejector pins, ejector sleeves, or stripper plates depending on part geometry and surface requirements.
The ejector system parts guide provides additional detail about common ejection hardware used in production molds.
A standard ejection sequence usually follows these steps:
- The mold opens after cooling.
- Ejector plates move forward.
- Ejector pins contact the molded part.
- The part separates from the core.
- The ejector system retracts before the next cycle.
Different parts require different ejection strategies. Thin-wall parts often need carefully distributed ejector pins to avoid deformation. Cosmetic housings may use sleeves or stripper systems to reduce visible marks.
Common ejection problems
| Problem | Likely Cause | Result |
|---|---|---|
| Pin marks | Excess ejector pressure | Cosmetic defects |
| Part sticking | Poor draft angle | Cycle interruption |
| Cracking | Uneven ejection force | Scrap parts |
| Warping | Hot ejection timing | Dimensional instability |
Replacing worn ejector pins without inspecting alignment components can waste time and money. Ejection problems sometimes start with mold misalignment, not the pins themselves.
A medical electronics housing illustrates this well. Poor ejector placement near cosmetic surfaces can leave visible witness marks, even when molding conditions stay within normal production ranges.
What do runners, gates, and cooling channels do?
Runners and gates direct molten plastic into the mold cavity, while cooling channels remove heat for stable cycle times. Poor flow or cooling design often causes short shots, warping, or sink marks.
The runner system moves molten resin from the injection unit into the cavity. Gates control how resin enters the part itself. Cooling channels then remove heat so the molded component solidifies evenly before ejection.
According to the Wikipedia injection molding entry, cooling systems strongly influence cycle time and dimensional consistency during production.
| System | Main Job | Common Issue |
|---|---|---|
| Runner | Moves resin through mold | Flow imbalance |
| Gate | Controls cavity entry | Gate freeze-off |
| Cooling channel | Removes heat | Uneven cooling |
| Vent | Releases trapped air | Burn marks |
Cooling design becomes especially important in high-cavitation molds. A consumer electronics mold producing multiple thin-wall housings may require upgraded cooling channels to maintain stable cycle times across every cavity.
Why venting matters in injection molds
Vents allow trapped air to escape as molten resin fills the cavity. Without proper venting, compressed air can create burn marks, short shots, or incomplete filling.
The Elastron troubleshooting guide notes that poor venting often contributes to filling defects and trapped gas problems during molding cycles.
Complex custom runner systems are not always necessary. Standardized runner layouts often simplify maintenance and reduce downtime for many production programs, especially when part geometry remains relatively simple.
Which injection mold parts wear out the fastest?
Ejector pins, gates, bushings, and high-friction inserts usually wear out first because they experience constant movement, pressure, and heat exposure during molding cycles.
Moving and high-contact components naturally wear faster than static mold plates. Production volume, resin abrasiveness, and maintenance practices all affect how quickly this happens.
The mold wear components section helps production teams identify common replacement areas before failures disrupt production.
High-Wear Mold Components Checklist
| Component | Why It Wears | Common Symptom |
|---|---|---|
| Ejector pins | Constant sliding movement | Sticking or pin marks |
| Guide bushings | Repeated alignment contact | Flashing |
| Gates | High resin velocity | Filling inconsistency |
| Inserts | Friction and heat | Dimensional drift |
The ESCATEC injection molding FAQ explains that mold lifespan depends heavily on steel quality and operating conditions.
A buyer choosing between hardened steel ejector pins and untreated components should consider production volume carefully. Lower-cost untreated pins may work for short runs, but hardened components usually last much longer in continuous manufacturing environments.
Interchangeable inserts also wear differently depending on resin type. Glass-filled materials often accelerate abrasion on cavity inserts compared to standard resins.
What should buyers check before sourcing mold components?
Buyers should verify tolerance capability, steel grade, heat treatment quality, surface finish, and supplier delivery performance before ordering mold components for production tooling.
Mold components directly affect production reliability, so sourcing decisions should focus on consistency instead of price alone. Poorly machined or untreated components can create repeat maintenance issues that cost far more than the original savings.
Manufacturers looking for standard mold components should compare material specifications, machining precision, and lead-time stability before placing production orders.
Mold Component Buyer Checklist
- Confirm steel grade and hardness specifications
- Verify tolerance capability for precision parts
- Review heat treatment process documentation
- Check surface finish requirements
- Compare replacement lead times
- Determine whether parts are standard or custom
- Evaluate supplier consistency across repeat orders
Custom mold components are not always necessary. Standardized parts often simplify future maintenance because replacements remain easier to source and install.
For example, a consumer electronics supplier using interchangeable cavity inserts can support multiple product versions without building entirely new molds. This lowers tooling costs and shortens revision lead times during product updates.
How do mold component failures affect production quality?
Mold component failures directly affect dimensional consistency, surface quality, and production stability. Many common molding defects trace back to worn or poorly maintained tooling parts instead of machine settings alone.
The precision mold parts resource explains how tooling accuracy supports repeatable molding performance across long production runs.
Mold Defect Troubleshooting Matrix
| Defect | Likely Failed Component | Common Cause | Recommended Inspection |
|---|---|---|---|
| Flashing | Guide bushings | Mold misalignment | Check alignment wear |
| Short shot | Gate or vent | Restricted flow | Inspect gate condition |
| Burn marks | Venting system | Trapped gas | Clean vent channels |
| Sticking | Ejection system | Poor release force | Inspect ejector movement |
| Warping | Cooling channels | Uneven temperature | Check cooling flow |
Many processors adjust injection pressure first when flashing appears. That approach does not always solve the root issue. If guide systems are worn, the mold may continue leaking resin even with lower processing pressure.
Cooling problems create similar confusion. Uneven cooling channels often cause warping that operators mistakenly blame on material shrinkage or cycle timing. Inspecting the cooling layout usually reveals the real problem faster.
What to Do Next
Understanding injection molding mold parts helps manufacturers make better tooling decisions before problems appear on the production floor. The core, cavity, guide system, cooling channels, and ejector components all affect mold life and part quality in different ways.
If you're evaluating tooling suppliers or replacing worn mold components, focus on precision, material quality, and long-term repeatability instead of upfront cost alone. Standardized components can simplify maintenance, but high-cycle molds may still require upgraded materials and tighter tolerances for stable production over time.
Frequently Asked Questions
What are the components of an injection mold?
Injection molds contain several functional component groups. These usually include the core, cavity, ejector system, guide pins, bushings, runners, gates, cooling channels, and venting features that support molding, alignment, and part release.
What is the core and cavity in injection molding?
The cavity and core are the primary forming components inside the mold. The cavity creates the outside shape of the part, while the core forms internal geometry and hollow sections during molding.
What do ejector pins do in injection molding?
Ejector pins safely remove molded parts from the cavity after cooling. Proper pin placement helps prevent sticking, cracking, and visible surface marks during the ejection stage.
Which mold components wear out fastest?
High-friction and moving components usually wear out first. Ejector pins, guide bushings, inserts, and gates experience repeated heat, pressure, and motion during production cycles.
What causes flashing in injection molds?
Flashing happens when molten plastic escapes between mold surfaces. Worn alignment components, damaged guide bushings, or poor mold closure often allow resin leakage at the parting line.
How long do injection mold components last?
Mold component lifespan depends on steel quality, resin type, maintenance practices, and production volume. Hardened steel components generally last longer in high-cycle manufacturing environments.
Share:


Written By miashuvo
NEWS
GET SERVICE
With quality parts to meet every budget and friendly staff trained to make your visit informative and hassle free.